
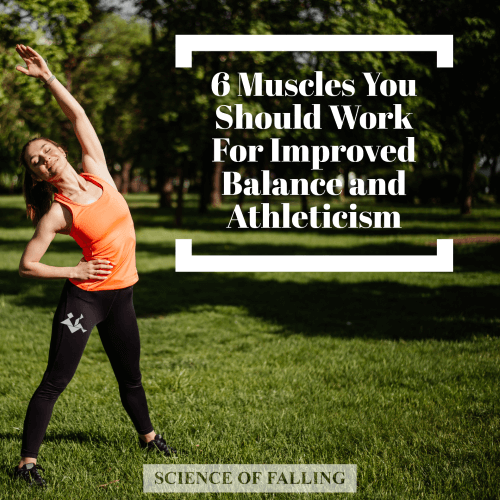
6 Muscles You Should Work for Improved Balance and Athleticism
Essential Points:
Balance and Athleticism Begin with Strength: Building a strong core, quads, hamstrings, gluteus medius, calves, and anterior tibialis is essential for improving balance and athletic performance, helping stabilize the body and control movements during dynamic activities.
Targeted Exercises for Key Muscles: Specific exercises for each of these muscle groups, such as squats, calf raises, and hamstring curls, can be incorporated into your routine to strengthen the muscles responsible for maintaining balance and reducing the risk of falls.
Create a Customized Workout Routine: You can integrate these exercises into your current workout plan or create a dedicated routine to target these muscle groups, aiming for 2-3 sets of 8-15 repetitions per exercise to enhance strength and balance over time.
Disclaimer: This blog post contains affiliate links. This means if you make a purchase through them, I may earn a small commission, at no extra cost to you! It's a win-win. You get great products, and I get to keep the lights on here at Science of Falling. Thanks for supporting my work!
When it comes down to it, we ALL need balance. Whether you are in your 80s or 90s and learning to walk again, or you are making moves on the field in college, balance is key.
Balance is a neuromuscular phenomenon. That means to express proper balance you need both a properly working nervous system and adequate strength to maintain balance. In this article we are going to tackle the strength side and talk about the six most important muscles for balance.
Those six muscles include:
Core musculature
Quadriceps
Hamstrings
Gluteus Medius
Calf Complex
Anterior Tibialis
We will be talking about these muscles in isolation from each other so that you have a good idea of the importance of each. All of these muscles can be worked in isolation with various exercises. Fortunately, many of these muscles are also worked in tandem with what we call “compound exercises” such as a squat. By the end of this article you will not only understand how each muscle contributes to balance and athletic performance, but also how to create a basic, yet extremely effective, workout program to enhance your performance in life.
For the best results and quickest progress make sure to perform these exercises with resistance if possible! For the weighted exercises I highly recommend using adjustable weights such as PowerBlocks so that your resistance can grow with your increasing strength overtime. Resistance bands, including tube bands and loop bands, are also a phenomenal and compact way to increase the challenge for these exercises.
Let’s get into it!
Core Musculature
What is the core?

https://samarpanphysioclinic.com/deep-muscles-of-the-core/
The core is often spoken about in many ways, but most people don't actually understand what makes up the core. Is it just the abs? Is it the abs and hips? Or is it something else?
The core is actually more properly defined as the muscles that make up the trunk of your body. This would include the abdominal muscles, the low back muscles, and technically the hip musculature (we will discuss this a bit more in the gluteus medius section). In the rehab and fitness worlds we call this the lumbo-pelvic-hip complex (LPHC). The LPHC is made up of approximately 35 different muscles that work as a team. That's a bit more than just the rectus abdominis (the muscle that gives you a six-pack).
I’ll spare you the tedious anatomy lesson. All you have to know is your core is more than just your abs, it’s your entire trunk. If we know this, we can more effectively work the core to create better balance for life and athletics.
Why’s the core important for balance?
So why is the core so important for balance? Simple, it gives stability to your spine and helps transfer forces throughout the body.
Think of it this way.
Your body is like a tall building, and your spine is the central support column. Now, imagine the core muscles as the braces and beams that reinforce the building's structure, keeping it stable and upright.
In this analogy, just like a building needs strong supports to withstand external forces like wind or earthquakes, your spine needs a strong core to withstand the various movements and pressures placed upon it during daily activities. Without a solid core, much like a building lacking proper reinforcement, your spine may struggle to maintain balance and stability, especially when performing tasks that require coordination and agility.
How do we work the core effectively?
To work the core effectively for balance our aim is to create stiffness. This stiffness allows the spine to be stable enough for the arms and legs to do their thing while helping us maintain balance.
I like to target the core in 3 different ways for this goal: anti-rotation, anti-side bending, anti-flexion/extension.
Exercise 1: Anti-Rotation - Paloff Press
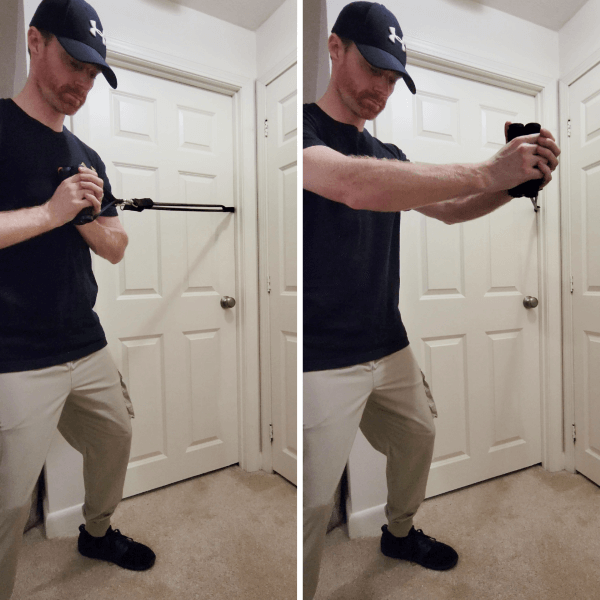
The Pallof press is a great exercise for targeting the core muscles, particularly the obliques, while also engaging the shoulders, chest, and arms. Here's how to perform the Pallof press:
Setup:
Attach a resistance band or cable machine handle to a sturdy anchor point at chest height.
Stand perpendicular to the anchor point with your feet shoulder-width apart and knees slightly bent.
Grasp the handle with both hands and step away from the anchor point until there is tension on the band or cable.
Starting Position:
Hold the handle with both hands at chest level, elbows bent, and palms facing each other.
Engage your core muscles to stabilize your spine and pelvis. Your body should be in a straight line from head to heels, with no arching or rounding of the back.
Execution:
Keeping your core tight and your torso facing forward, exhale as you extend your arms straight out in front of you.
Fully extend your arms, pushing the handle away from your chest, while maintaining a stable core and upright posture.
Hold the extended position for a moment, feeling the tension in your core and upper body.
Inhale as you slowly return the handle back to the starting position, keeping your core engaged and resisting the pull of the band or cable.
Repeat for the desired number of repetitions, then switch sides by facing in the opposite direction.
Key Points to Remember:
Keep your shoulders down and away from your ears throughout the movement.
Maintain a slight bend in your elbows to avoid locking them out.
Focus on controlling the movement with your core muscles, rather than relying solely on your arms.
Avoid twisting or rotating your torso as you press the handle away.
Keep your hips and shoulders square to the anchor point throughout the exercise
Exercise 2: Anti-Sidebending - Unilateral Farmers Walk/Hold
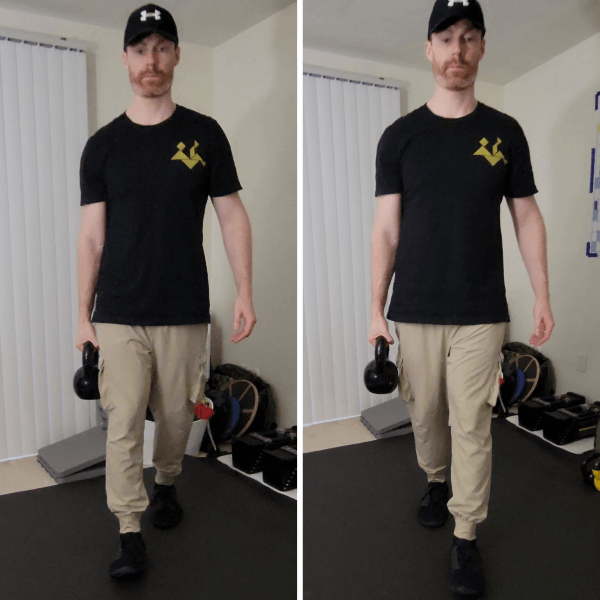
The unilateral farmer's carry is an excellent exercise for improving core stability, grip strength, and overall functional strength. Here's how to perform it:
Setup:
Stand tall with a dumbbell or kettlebell in one hand.
Ensure your feet are hip-width apart and your shoulders are back and down.
Engage your core muscles to stabilize your spine and pelvis.
Starting Position:
Hold the weight at your side with a neutral grip (palms facing inward) and your arm fully extended.
Maintain an upright posture with your chest lifted and shoulders squared.
Execution:
Begin walking forward in a straight line while holding the weight in one hand.
Focus on maintaining an upright posture and stable core throughout the movement.
Keep your shoulders level and avoid leaning or tilting to one side.
Take controlled steps, placing one foot in front of the other, and continue walking for a set distance or time.
Key Points to Remember:
Keep your core engaged throughout the exercise to prevent excessive leaning or twisting.
Maintain a neutral spine by avoiding arching or rounding your back.
Keep your shoulders down and away from your ears.
Focus on a slow and controlled pace, rather than rushing through the movement.
Keep your gaze forward and avoid looking down at the ground.
Ensure equal weight distribution between both feet.
Switching Sides:
Once you have completed the desired distance or time with one hand, switch the weight to the opposite hand and repeat the exercise.
Maintain proper form and technique on both sides to ensure balanced strength development.
Exercise 3: Anti-Flexion/Extension - Plank

Planks are a fundamental exercise for building core strength and stability. Here's how to perform a basic plank with proper form:
Setup:
Start by positioning yourself face down on the floor or mat.
Place your elbows directly beneath your shoulders, with your forearms resting on the ground parallel to each other.
Extend your legs behind you, toes tucked under, and feet hip-width apart.
Engage your core muscles by drawing your navel toward your spine.
Execution:
Lift your body off the ground, maintaining a straight line from your head to your heels.
Support your weight on your forearms and toes, with your elbows directly beneath your shoulders.
Keep your body in a neutral position, avoiding sagging or arching of the back.
Focus on contracting your abdominal muscles and squeezing your glutes to maintain stability.
Hold this position for the desired duration, typically starting with 20-30 seconds and gradually increasing as you build strength.
Key Points to Remember:
Maintain a neutral spine by keeping your head in line with your spine, avoiding excessive tilting or lifting of the chin.
Keep your shoulders relaxed and away from your ears, with your shoulder blades pulled down and back.
Engage your entire core, including your abdominals, obliques, and lower back muscles.
Breathe steadily throughout the exercise, inhaling through your nose and exhaling through your mouth.
Avoid holding your breath or allowing your hips to drop toward the ground.
Focus on quality over quantity, ensuring proper form and alignment throughout the entire duration of the plank.
Modifications:
If holding a full plank is too challenging initially, you can start with a modified plank on your knees instead of your toes.
Alternatively, you can perform plank variations such as side planks or plank rotations to target different areas of the core.
Quadriceps Femoris (Quads)

https://www.beachbodyondemand.com/blog/quad-muscles-thigh-anatomy
What are the quads?
The quadriceps are your front thigh muscles. As you may have already guessed there are 4 muscles in this area, hence “quad”. These four muscles are called the rectus femoris, vastus lateralis, vastus intermedius, and vastus medialis. Although these are technically different muscles, we group them together because they work as a team to mainly extend the knee.
Although these muscles extend the knee, this movement can look different depending on where your foot is. If your foot is floating in the air, this knee extension looks like a kick. If the foot is planted firmly on the ground this knee extension helps straighten the leg and stand up.
Why is the quad important for balance?
The quads are quite powerful and work in coordination with other lower body muscles, such as the glutes and hamstrings, to control movements and shifts in body weight.
Strong quadriceps contribute to better posture, as they help align the body's center of gravity over the base of support, reducing the risk of falls and improving overall balance. During dynamic movements like jumping or cutting, the quadriceps provide essential support and control, allowing for smooth and coordinated motion.
Maintaining strength in the quadriceps is vital for optimizing balance, mobility, and functional performance for everything from standing up from a chair to running through a field of opponents on the football field.
How do we work the quads effectively?
Working the quads effectively really comes down to working on pure strength. This muscle group thrives with high levels of strength and will transfer nicely to your functional movements in life.
I like to work the quads in two different ways to get the most bang for your buck. The first way is simply through knee extension which isolates the quad. The second way is by performing squats which allows surrounding musculature to also be worked at the same time.
Exercise 1: Seated Knee Extension
Seated knee extensions are an effective exercise for targeting and strengthening the quadriceps muscles directly.
Here's how to perform seated knee extensions with proper form:
Note: Machine leg extensions are described below due to higher complexity of movement. For standard knee extensions, as shown in photo above, simply sit in a stable position and kick outwards. Add weight to ankle as needed.
Setup:
Sit on a leg extension machine with your back against the backrest and your feet flat on the floor.
Adjust the machine so that the padded bar rests comfortably against your lower legs, just above your ankles.
Adjust the seat height so that your knees are aligned with the axis of rotation of the machine.
Execution:
Grasp the handles on the sides of the seat for stability.
Engage your core muscles to maintain an upright posture and stabilize your spine.
Exhale as you extend your legs, pushing against the resistance provided by the machine.
Straighten your knees fully, lifting the padded bar until your legs are almost straight, but avoid locking your knees.
Pause briefly at the top of the movement, feeling the contraction in your quadriceps.
Inhale as you slowly lower the padded bar back to the starting position, maintaining control throughout the movement.
Repeat for the desired number of repetitions.
Key Points to Remember:
Keep your back firmly against the backrest throughout the exercise to support your spine and maintain stability.
Maintain a slow and controlled pace, focusing on using your quadriceps to lift the weight rather than momentum.
Avoid jerking or swinging the weight, as this can increase the risk of injury and reduce the effectiveness of the exercise.
Keep your feet flat on the floor throughout the movement, with your toes pointing forward.
Focus on maintaining proper form and alignment, ensuring that your knees track in line with your toes.
Adjust the weight on the machine as needed to ensure that the exercise is challenging but allows you to complete the desired number of repetitions with good form.
You may also perform this movement without a machine in a seated position. Simply sit and kick outwards. For increased challenge add ankle weights.
Exercise 2: Squat
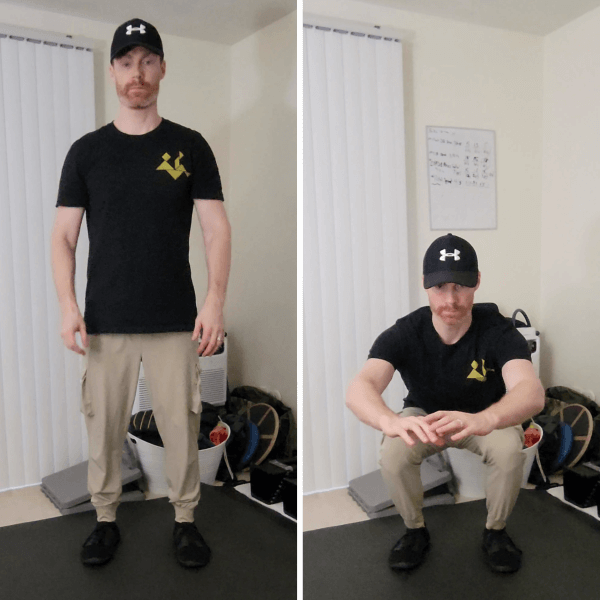
Squats are a one-stop shop for lower body strengthening and are a great way to load the quadriceps effectively with either your body weight or extra load.
Setup:
Stand with your feet shoulder-width apart, toes pointing slightly outward.
Engage your core muscles by drawing your navel toward your spine, and keep your chest lifted with your shoulders pulled back and down.
Execution:
Initiate the movement by hinging at your hips, as if you were sitting back into a chair.
Bend your knees and lower your body down, keeping your back straight and chest lifted.
Lower yourself until your thighs are at least parallel to the ground, or as far down as you can comfortably go while maintaining proper form.
Keep your knees in line with your toes and avoid letting them collapse inward.
Maintain a neutral spine throughout the movement, avoiding excessive rounding or arching of the back.
Keep your weight centered over your heels as you descend, and avoid lifting your heels off the ground.
Keep your head facing forward or slightly upward, and maintain a natural curve in your neck.
Exhale as you push through your heels and straighten your legs to return to the starting position.
Squeeze your glutes at the top of the movement to fully extend your hips.
Repeat for the desired number of repetitions.
Key Points to Remember:
Focus on controlled movement throughout the exercise, both on the descent and ascent.
Keep your core engaged and your torso stable to support your spine.
Avoid rounding your back or allowing your knees to cave inward, as this can increase the risk of injury.
Keep your heels planted firmly on the ground throughout the movement to maintain stability.
Start with a light weight or just your body weight if you're new to squats, and gradually increase the load as you become more comfortable with the movement.
Listen to your body and stop if you experience any pain or discomfort.
Hamstrings
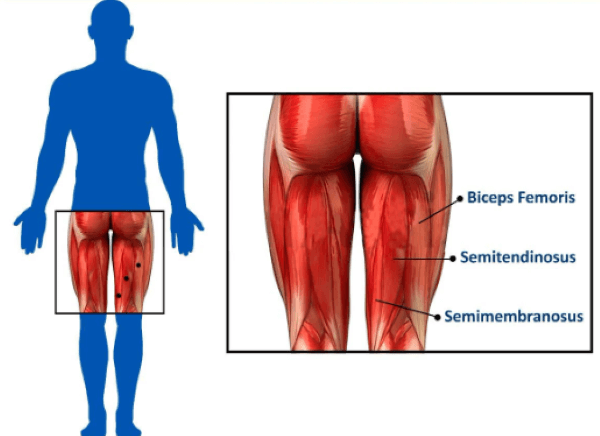
https://www.thornleighphysio.com.au/blog-2/2020/5/11/whats-the-difference-between-the-medial-and-lateral-hamstrings
What are the hamstrings?
The hamstrings are the meaty muscles in the back of your thigh. Just like the quad, the hamstring is not just one muscle but rather a group. They consist of the biceps femoris, the semimembranosus, and the semitendinosus.
These muscles work as a team to mainly flex the knee. They also have a role in extending the hip and leg backwards to a much smaller degree.
Why are the hamstrings important for balance?
The hamstrings play a critical role in balance by stabilizing the knee joint during movements like bending or straightening the knee. Alongside the quadriceps, they distribute forces evenly, ensuring joint alignment and stability for increased balance.
Additionally, the hamstrings contribute to proprioception (the ability to sense where a joint is in space), enhancing the body's awareness of its position and movements. They are essential for controlling dynamic lower body movements, such as lunges and squats, which improves overall balance and stability.
How do we work the hamstrings effectively?
Just like the quads, we want to work the hamstrings in a way that effectively utilizes their primary functions (knee flexion and hip extension). To do this we can utilize 3 movements: standing hamstring curl, standing hip extension, romanian deadlift.
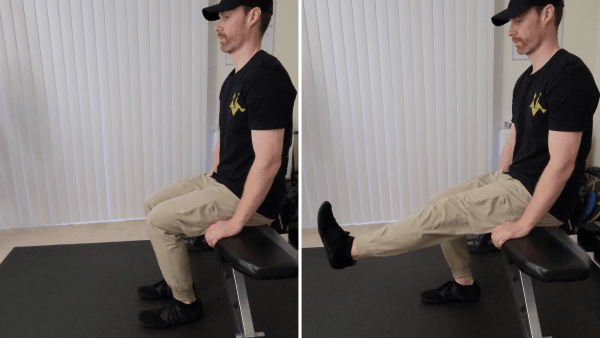
Exercise 1: Standing Knee Flexion
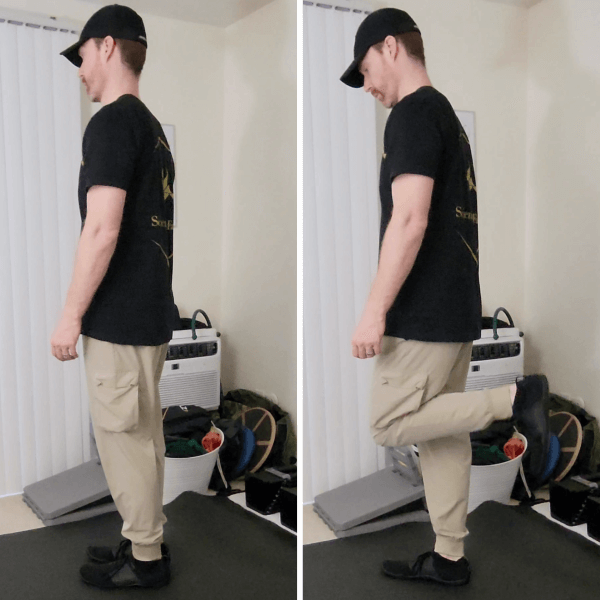
Standing knee flexion, also known as the standing hamstring curl, is a great exercise for targeting the hamstrings directly using only your body weight or additional load.
Setup:
Stand tall with your feet hip-width apart and your arms by your sides.
Shift your weight onto one leg while keeping a slight bend in the knee of the supporting leg.
Engage your core muscles to maintain balance and stability throughout the exercise.
Execution:
Begin by flexing your knee, lifting your foot toward your glutes.
Contract your hamstring muscles to curl your heel toward your buttocks, keeping your thigh in line with your torso.
Focus on squeezing your hamstring as you lift your foot, feeling the contraction at the top of the movement.
Hold the peak contraction for a moment, then slowly lower your foot back to the starting position under control.
Avoid swinging your leg or using momentum to lift the foot. Keep the movement controlled and deliberate.
Key Points to Remember:
Keep your upper body tall and your shoulders relaxed throughout the exercise.
Maintain a slight bend in the supporting knee to stabilize your stance.
Focus on feeling the contraction in your hamstring as you lift your foot toward your glutes.
Keep your movements smooth and controlled, avoiding jerky or rapid motions.
Perform the desired number of repetitions on one leg before switching to the other leg.
Modifications:
To increase the intensity, you can use ankle weights or resistance bands wrapped around your ankle.
If balance is challenging, you can hold onto a sturdy object for support, such as a chair or wall, until you feel more confident.
Exercise 2: Standing Hip Extension (hamstring emphasis)
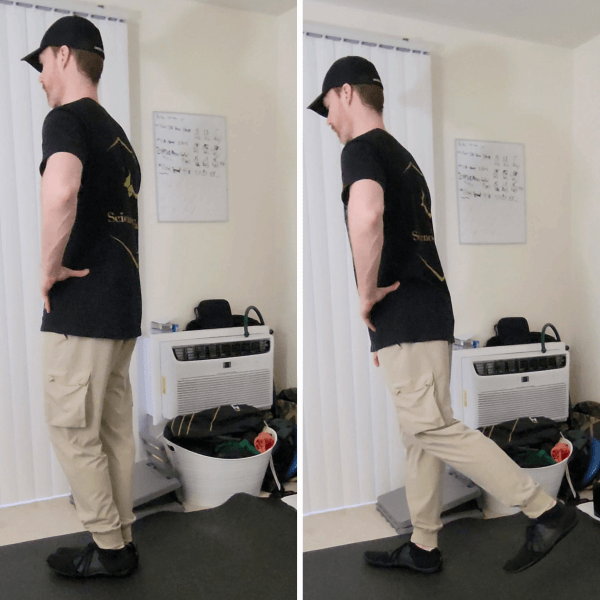
Although hip extension is primarily a job for the gluteus maximus (the butt muscle), the hamstrings also play a role in this movement. Here is how to perform the standing hip extension exercise:
Setup:
Stand tall with your feet hip-width apart, facing a wall or sturdy support for balance.
Engage your core muscles to stabilize your spine and maintain good posture throughout the exercise.
Execution:
Begin by shifting your weight onto one leg while keeping a slight bend in the knee.
Brace your core and hinge at your hips, leaning forward slightly while keeping your back straight.
Extend the non-supporting leg straight back behind you, focusing on using your hamstrings to lift the leg and maintain control.
Keep your foot flexed and your toes pointing downward to further engage the hamstrings.
Squeeze your glutes at the top of the movement to maximize activation of the hamstrings.
Hold the extended position for a moment, feeling the contraction in your hamstrings.
Slowly lower the leg back down to the starting position with control.
Repeat for the desired number of repetitions on one side before switching to the other leg.
Key Points to Remember:
Focus on using the hamstrings to lift the leg, rather than relying solely on momentum.
Keep your movements slow and controlled throughout the exercise to maximize muscle activation and minimize the risk of injury.
Maintain stability and balance by keeping your core engaged and your body centered over the supporting leg.
Avoid arching your lower back or leaning too far forward, as this can put strain on the spine.
Keep your shoulders relaxed and your chest lifted throughout the movement.
Adjust the range of motion based on your flexibility and comfort level, ensuring that you feel a contraction in the hamstrings without compromising form.
Exercise 3: Romanian Deadlift
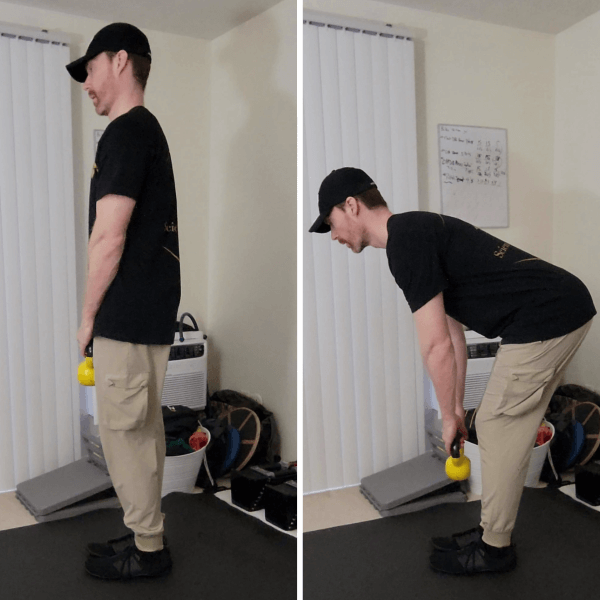
The romanian deadlift, like the squat, is a great way to work on multiple muscle groups in the lower body at once. It is a bit harder to perform than the previous two exercises as it takes a higher level of hip coordination, but highly effective for hamstring strengthening. Here is how to perform the exercise:
Setup:
Stand tall with your feet hip-width apart, holding a pair of dumbbells or a barbell with an overhand grip in front of your thighs.
Engage your core muscles to stabilize your spine and maintain a slight bend in your knees throughout the exercise.
Execution:
Begin by hinging at your hips, pushing your hips back as you lower the weights toward the ground.
Keep your back flat and chest lifted, and allow the dumbbells or barbell to slide down the front of your thighs while maintaining a neutral spine.
Lower the weights until you feel a stretch in your hamstrings, keeping them engaged throughout the movement.
Focus on feeling the stretch in your hamstrings as you lower the weights, ensuring that your back remains straight and your core engaged.
Keep the weights close to your body as you lower them, and avoid rounding your back or allowing your shoulders to slump forward.
Once you feel a stretch in your hamstrings, drive through your heels to return to the starting position, squeezing your glutes at the top of the movement.
Maintain control throughout the exercise, focusing on using your hamstrings to lift the weights rather than relying on momentum.
Repeat for the desired number of repetitions.
Key Points to Remember:
Focus on maintaining a neutral spine and keeping your back flat throughout the movement to minimize the risk of injury.
Keep your shoulders pulled back and down, and avoid shrugging them toward your ears.
Engage your core muscles throughout the exercise to stabilize your spine and maintain proper form.
Keep your knees soft and avoid locking them out at the top of the movement.
Control the descent of the weights, focusing on feeling the stretch in your hamstrings as you lower them.
Use a weight that allows you to perform the exercise with proper form and technique, gradually increasing the weight as you become stronger.
Gluteus Medius

https://heidenortho.com/gluteus-medius-tear/
What is the gluteus medius?
The gluteus medius is a small muscle located near the side of the hip. Although small, it is quite mighty when it comes to helping stabilize the pelvis and assist in balance.
Why is the gluteus medius important for balance?
The gluteus medius is crucial for balance as it stabilizes the pelvis during various activities like walking or standing on one leg. By preventing excessive tilting or dropping of the pelvis, it ensures that the body remains upright and centered over the base of support, enhancing overall balance.
Additionally, this muscle controls movements of the hip joint, aiding in maintaining proper alignment of the lower body and distributing weight evenly over the supporting leg, which is vital for balance and stability during dynamic movements.
Furthermore, the gluteus medius plays a key role in dynamic stability during activities like changing direction or transitioning between positions. It provides stability by controlling hip movements in multiple planes, helping to maintain balance and prevent falls, especially on uneven terrain or when external forces challenge stability. Strengthening exercises targeting the gluteus medius, such as lateral leg raises or clamshells, can improve its function, enhancing balance, stability, and overall lower body strength.
How do we work the gluteus medius effectively?
Considering that the gluteus medius works on both stabilizing the pelvis during static balance and helping stabilize during more dynamic movements, I like to target this muscle in two different ways: tandem balance and lateral band walks. As mentioned above you can also work these muscles with lateral leg raises and clamshells, but I find that many people lose proper form quite quickly.
Exercise 1: Tandem Balance
Although tandem balance is not technically a strengthening exercise, it works the muscle in a key way by working static hip stability. Plus, by adding a weight hold to one side of the body we can make a standard balance exercise into an isometric strengthening exercise. Here’s how to perform the exercise:
Setup:
Stand in an open area with enough space to move around comfortably.
Begin by standing with your feet together, arms relaxed at your sides.
Lift one foot slightly and place it directly in front of the other foot, heel to toe, creating a straight line.
Keep your gaze fixed on a focal point in front of you to help maintain balance.
Execution:
Engage your core muscles to stabilize your torso and maintain an upright posture.
Balance on both feet. You may feel more weight on the back foot.
Hold this position for as long as you can while maintaining stability and control.
If you feel confident and stable, you can challenge yourself by slowly moving your arms out to the sides, extending them overhead, or closing your eyes to further challenge your balance. Weight can also be held on one side of the body.
Key Points to Remember:
Focus on maintaining a straight line from your head to your heel, keeping your body aligned and avoiding leaning to one side.
Keep your hips level and avoid tilting or rotating your pelvis.
Engage your core muscles throughout the exercise to help stabilize your body.
If you lose your balance, gently return to the starting position and try again.
Perform the exercise on both sides by switching the position of your feet, placing the opposite foot in front.
Progressions:
As you become more proficient, you can increase the difficulty of the exercise by extending the duration of each hold or by incorporating additional challenges such as arm movements or head turns.
You can also try performing the exercise on different surfaces, such as a foam pad or a balance board, to further challenge your stability.
Holding a weight in one hand can also increase the challenge and build more strength in the muscle.
Exercise 2: Lateral Band Walks
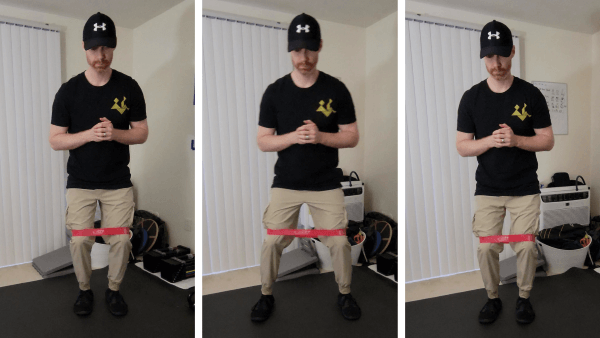
Lateral band walks develop the ability to use the glutues medius to stabilize the pelvis effectively while moving. This is imperative when it comes to athletic endeavors in order to develop proficient force transfer. Here is how to perform the exercise:
Setup:
Place a resistance band around your legs, just above your knees.
Stand with your feet hip-width apart and your knees slightly bent.
Engage your core muscles to stabilize your spine and maintain good posture throughout the exercise.
Execution:
Take a small step to the side with one foot, keeping tension on the resistance band.
Follow with the other foot, stepping to bring your feet back to hip-width apart.
Maintain a slight bend in your knees and keep your hips level throughout the movement.
Continue stepping sideways, alternating the leading foot, for the desired number of repetitions or distance.
Focus on pushing against the resistance band with your outer thigh and engaging the gluteus medius of the leading leg to control the movement.
Keep your feet pointing straight ahead and avoid letting your knees collapse inward.
Maintain a slow and controlled pace, emphasizing the outward movement against the resistance of the band.
Key Points to Remember:
Keep tension on the resistance band throughout the exercise to effectively target the gluteus medius.
Focus on quality over quantity, ensuring proper form and control with each step.
Keep your core engaged and your spine neutral to support your posture and stability.
Avoid leaning excessively to one side or letting your upper body tilt during the movement.
Incorporate lateral band walks into your warm-up routine or as part of a lower body strengthening workout to improve hip stability and strengthen the gluteus medius.
Progressions:
As you become more proficient, you can change out the band to a stronger and more resistant band.
Putting the band of the same resistance from the knees to the ankles or foot can also increase the relative load on the body and give you a harder workout.
Calf Complex

https://www.foot-pain-explored.com/gastrocnemius.html
What is the calf complex?
The calf complex, also known as the triceps surae, is a group of muscles located on the back of the lower leg. It primarily consists of two main muscles called the gastrocnemius and soleus. It additionally has a small third muscle called the plantaris in some people.
Why is the calf complex important for balance?
The calf complex is integral for balance as it stabilizes the ankle joint, controlling movements like dorsiflexion (foot going up) and plantar flexion (foot going down). These muscles provide a solid foundation for maintaining equilibrium by adjusting body alignment and distributing weight effectively. Additionally, they contribute to proprioception, enhancing the body's awareness of its position in space and facilitating quick adjustments to maintain balance.
How do we work the calf complex effectively?
Due to its anatomy, the calf complex is worked effectively in two different ways. The first way is with a straight knee, such as a straight leg calf raise, which emphasizes the gastrocnemius. The second way is with a bent knee, such as a bent knee calf raise, which emphasizes the soleus. By working both positions you can fully strengthen the calf complex.
Exercise 1: Straight Leg Calf Raise
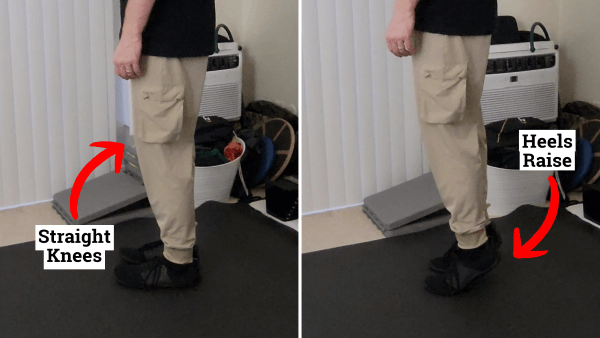
Performing straight leg calf raises effectively targets both main calf muscles, but primarily the gastrocnemius. Here is how to perform the exercise:
Setup:
Stand with your feet hip-width apart on a flat surface, ensuring your weight is evenly distributed between both feet.
Keep your legs straight and your knees unlocked throughout the exercise.
You may choose to hold onto a stable surface, such as a wall or chair, for balance support.
Execution:
Begin by lifting your heels off the ground as high as possible, focusing on contracting your calf muscles.
Rise onto the balls of your feet, pushing through the balls of your feet and toes.
Hold the top position for a brief moment, squeezing your calf muscles at the peak of the movement to maximize contraction.
Slowly lower your heels back down to the starting position, maintaining control throughout the descent.
Avoid allowing your heels to drop below the level of your toes at the bottom of the movement.
Aim for a full range of motion, lifting your heels as high as possible without compromising form.
Perform the exercise in a smooth, controlled manner, focusing on the quality of the contraction rather than speed.
Key Points to Remember:
Keep your core engaged and your body upright throughout the exercise to maintain proper alignment.
Focus on using your calf muscles to lift your heels, rather than relying on momentum or other muscles.
Keep your movements slow and controlled, emphasizing the contraction of the calf muscles at the top of the movement.
If you experience any discomfort or pain, adjust the range of motion or decrease the number of repetitions.
Exercise 2: Bent Leg Calf Raise
Performing bent leg calf raises effectively targets the soleus muscle of the calf. Here's how to perform this exercise:
Setup:
Stand with your feet hip-width apart on a flat surface, ensuring your weight is evenly distributed between both feet.
Keep a slight bend in your knees throughout the exercise to engage the soleus muscle.
You may choose to hold onto a stable surface, such as a wall or chair, for balance support.
Execution:
Begin by lifting your heels off the ground as high as possible, focusing on contracting your calf muscles.
Rise onto the balls of your feet, pushing through the balls of your feet and toes.
Hold the top position for a brief moment, squeezing your calf muscles at the peak of the movement to maximize contraction.
Slowly lower your heels back down to the starting position, maintaining control throughout the descent.
Avoid allowing your heels to drop below the level of your toes at the bottom of the movement.
Aim for a full range of motion, lifting your heels as high as possible without compromising form.
Perform the exercise in a smooth, controlled manner, focusing on the quality of the contraction rather than speed.
Key Points to Remember:
Keep your core engaged and your body upright throughout the exercise to maintain proper alignment.
Focus on using your calf muscles to lift your heels, rather than relying on momentum or other muscles.
Keep your movements slow and controlled, emphasizing the contraction of the calf muscles at the top of the movement.
If you experience any discomfort or pain, adjust the range of motion or decrease the number of repetitions.
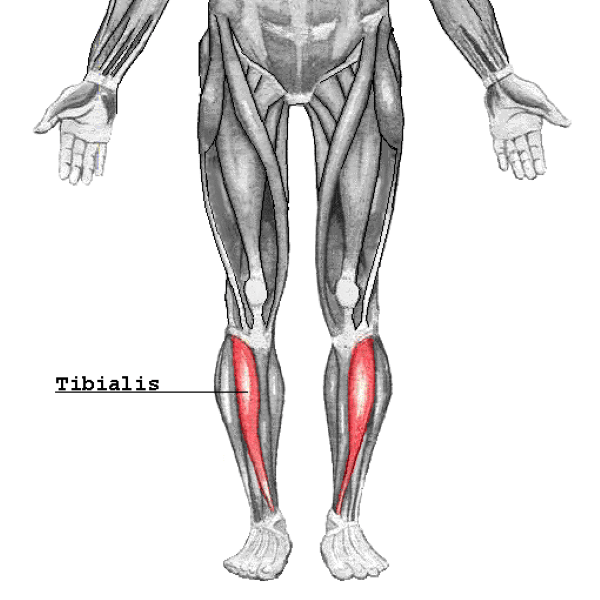
Anterior Tibialis
https://en.wikipedia.org/wiki/Tibialis_anterior_muscle
What is the anterior tibialis?
The anterior tibialis is a muscle in the front of the lower leg responsible for dorsiflexion, lifting the foot upward. It stabilizes the ankle and controls foot descent during activities like walking or running, contributing to lower leg strength and stability.
Why is the anterior tibialis important for balance?
The anterior tibialis is crucial for balance because it helps stabilize the ankle joint and control the movement of the foot. By actively dorsiflexing the foot, it assists in maintaining proper alignment and preventing excessive forward movement of the ankle, which is essential for stability during standing, walking, and other weight-bearing activities.
This muscle also plays a role in controlling the descent of the foot, providing support and balance control during movements such as stepping or landing. Strengthening the anterior tibialis can improve ankle stability, enhance proprioception, and ultimately contribute to better balance and reduced risk of falls or injuries.
How do we work the anterior tibialis effectively for balance?
As mentioned previously, the main role of the anterior tibialis is to dorsiflex the foot. We can work on this simply by performing standing toe raises or resisted seated dorsiflexion.
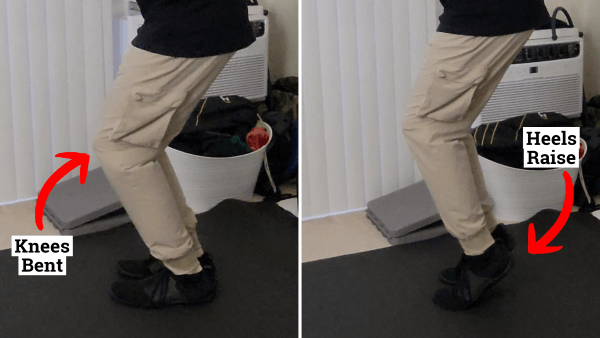
Exercise 1: Standing Toe Raises
Standing toe raises are the most basic way to work the anterior tibialis. These are great for higher repetition work. Here’s how to perform the exercise:
Setup:
Stand tall with your feet hip-width apart on a flat surface.
Ensure your weight is evenly distributed between both feet.
Execution:
Lift the front of your feet off the ground by dorsiflexing your ankles, pulling your toes towards your shins.
Focus on using the muscles on the front of your shins, specifically the anterior tibialis, to perform the movement.
Hold the top position for a moment, feeling the contraction in the muscles of your shins.
Avoid pushing through the balls of your feet or lifting your heels off the ground, as this would engage the calf muscles.
Slowly lower the front of your feet back down to the starting position with control.
Repeat for the desired number of repetitions, aiming for 20-25 repetitions to start as this muscle is primarily endurance focused.
Key Points to Remember:
Keep your core engaged and your body upright throughout the exercise to maintain proper alignment.
Focus on isolating the movement to the front of your shins, avoiding any involvement of the calf muscles.
Maintain a slow and controlled pace, emphasizing the contraction in the muscles of your shins.
Use a smooth and fluid motion, lifting the front of your feet and lowering back down with control.
If you find it challenging to perform the exercise without engaging the calf muscles, focus on minimizing their involvement by consciously directing the effort to the anterior tibialis.
Exercise 2: Resisted Seated Dorsiflexion
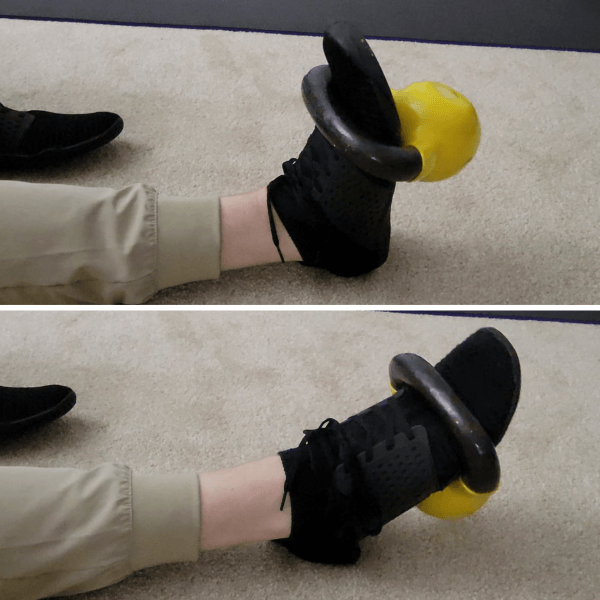
For increased strengthening, adding a band (or other weighted implement such as a kettlebell) to your toe raises is the easiest way to go. Here’s how to perform the exercise:
Setup:
Sit comfortably on a chair, bench, or the floor with your feet flat on the ground.
Loop one end of a resistance band or handle of a kettlebell around the top of one foot, securing it firmly in place.
Anchor the other end of the resistance band to a sturdy object in front of you, such as a table leg or heavy piece of furniture.
Execution:
Sit up tall with your back straight and engage your core muscles to stabilize your spine.
Begin by dorsiflexing your ankle, pulling your toes toward your shin against the resistance of the band or kettlebell.
Keep your heel on the ground and focus on contracting the muscles on the front of your shin, specifically the anterior tibialis.
Hold the dorsiflexed position for a moment, feeling the contraction in your anterior tibialis.
Slowly release the tension on the band and return to the starting position, allowing your foot to return to a neutral position.
Repeat for the desired number of repetitions, aiming for 10-15 repetitions to start.
Key Points to Remember:
Maintain a slow and controlled pace throughout the exercise, focusing on the quality of the movement.
Keep your movements smooth and fluid, avoiding any jerky or rapid motions.
Focus on isolating the movement to the muscles on the front of your shin, minimizing involvement of other muscles.
Keep your core engaged and your body stable throughout the exercise to prevent any unnecessary movement.
Adjust the resistance of the band as needed to ensure that the exercise is challenging but manageable.
Putting It All Together

Now that we’ve discussed the major muscles that need strengthening for good balance, let's put it all together into an actual exercise program.
Option 1: Add the exercises to your current routine
The easiest way to work on these during the week is to simply start incorporating one exercise into your current workout routine.
For instance, if you go running on Tuesdays, simply add in calf raises to the end of your running workout. Cycle the exercises and targeted muscle for each workout you do during the week. Do this rotation until you have worked each muscle group discussed above then repeat.
Option 2: Create a workout routine with the exercises
The second way of incorporating these exercises is to create a full workout routine with them. If you do not currently have a workout routine this is a great starting point.
To do this, simply pick one exercise for each muscle group described above and combine for a full workout routine. There are enough exercises to create at least 2 unique workouts for you to perform during the week.
As far as repetitions go, sticking to a simple 2-3 sets per exercise with 8-15 repetitions is a great starting point. You want to work hard enough to feel like you have done something, but not so hard you are too sore to function the rest of the week. It will take a week or two to find a rhythm and understand your tolerance for these exercises.
Final Thoughts
There you have it!
You are now officially an expert on which muscles contribute to balance and athleticism. Be sure to incorporate all of these muscle groups in your workout routine to bulletproof the strength side of your balance. Don’t be scared to push yourself and add load to any and all of these exercises.
You can never be too strong!
What’s Your Fall Proof Score?
Most people don’t notice their balance declining until something goes wrong.
This 10-minute self-assessment will show you:
• How stable your balance really is
• Where you're most at risk (strength, coordination, or falling ability)
• What to focus on first
No equipment. No guesswork. Just clear answers.
Thanks for checking out this article on the 6 major muscle groups that help with balance. Feel free to leave your questions, comments, or tips below!
As always, happy falling!
-Brent